Crag name: Koesawa
buttress (越沢バットレス)
Location: Hatonosu
(鳩ノ巣)
Map sheet: 23 [Yama-to-kougen-chizu (山と高原地図) series]
Rock type: Chert
Routes: approx.
17 (from IV+ to VI+ and 5.11-)
Although it has neither the scale of the Japan Alps nor the friction of granitic areas like Ogawayama, at 3 pitches high the Koesawa buttress provides a useful
training ground for many of the skills involved in getting safely up and down
routes longer than a rope length.
It is probably the most accessible multi-pitch venue near Tokyo.
Getting there:
If travelling from Tokyo (東京) or Shinjuku (新宿), take a Chuo Line (中央線) train
bound for Ōme (青梅). It may be necessary
to change trains at Tachikawa (立川) for the Ōme Line (JR青梅線), and
then change again at Ōme onto a train bound for Okutama (奥多摩). Get off at Hatonosu station, which is 2
stops before Okutama, the end of the line. From the station to the buttress
usually takes approximately 30-40 minutes on foot.
Exit Hatonosu station and
walk down the road on your left past the Yamabato
coffee shop, to join the main road.
Cross this road, walk about 20m to the right, and then take the narrow
road leading down to the bridge across the Tama
river (多摩川). Cross the bridge and
keep walking up this same road through a small village until you reach the end,
with a toilet block on your right.
The road turns into a concrete path, which in turn soon becomes a hiking
trail. You will come to a sharp
right bend, with an open wooden shelter with benches and a view back across the
Tama river to Hatonosu. Continue up the trail a short way until you join a tarmac road. Walk along the road for 5-10 minutes until the construction work ends, and drop down to your left to access a path going down the hillside to the campground.
Cross the bridge in the campground and walk down the trail on the right bank for about 100m. Cross a rickety suspension bridge to gain the left bank, then walk carefully down the (usually wet) path until you reach a wooden bridge. Cross this to the right bank and continue along the trail a short way until you come to
an open wooden shelter. The
buttress is up on your right from here.
The path to the foot of the buttress goes
through a small wooden gate. Although nobody is checking, consider putting the
200 yen asking price for entry into the small money box on the gate, as this
will go towards the renewal of the bolts, something that is badly needed at
this venue.
General info:
Here are a few points to note…
* The Koesawa buttress is
located on a tree-covered hillside in a deep valley, and receives direct
sunlight for a limited amount of time each day, so be prepared for cold rock
outside of the summer months.
* The rock type found here (chert) can be quite glassy, so allow time after
rainy days for it to dry.
* The rock is also quite sharp, and there have been cases of
accident or death due to cut ropes in the event of a fall, so climbing on
double ropes is strongly recommended here.
* In-situ protection on the buttress ranges from shiny new stainless
steel bolts down to rusty ring bolts, and pitons that must have been there for
decades. Think about what you
choose to clip, and remember the old maxim from the early days of
rock-climbing… “The leader must not fall”!
Getting down:
The top of the buttress is quite an interesting and picturesque
area, well worth exploring a little bit.
There is a shrine, complete with man-made rock steps and a taiko drum inside, and a photogenic
little spirit house sitting prominently on top of a rock, commanding some
lovely views all the way across to Mt
Kawanori (川乗山) on the other side of the main Tama River valley.
From the top you can either walk down the back or rappel off the
front. The walking trail descends
to a little stream, and then heads down through the forest to a long series of
scaffold stairs which bring you back to the river just before the buttress.
Alternatively, walk along the top to a large ledge where you will
find an in-situ rappel anchor. You
will need double ropes to get down from here. An initial 40m rappel will get
you to another in-situ anchor around a tree, and then another 30m rappel will
bring you to the ground.
Tree anchor for second rappel:
The routes:
Although there are quite a few separate ways to reach the top of the
buttress, I’ll limit this article to only the routes that I’ve personally
climbed on lead over the years.
1. No.2
Slab Route [“第2スラブルート”, 4 pitches, 100m, IV+] **
This is probably the classic route on the buttress, taking the huge
slab just left of centre. There is massive exposure for the grade.
Pitch 1: Easy scrambling to the first stainless steel bolt, then
climb up and into the groove to the tree.
Continue several metres beyond to a bolt anchor on a wide ledge.
1st belay ledge:
Pitch 2: Pick whichever line you like, and climb on good holds to
gain the semi-hanging belay in the corner at the start of the huge slab above.
Pitch 3: Traverse out to the right on tiny holds onto the slab, with
enormous exposure. Follow the bolts and pitons up and through a bulge, then
continue up the line of least resistance, eventually moving into the corner at
the top left of the slab. From there head up and right to a bolted belay
stance. This pitch needs up to 10
quickdraws.
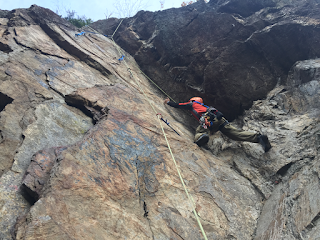
The traverse out onto the slab:
Pitch 4: Scramble up the broken ground along the bottom of the trees
to reach flat ground at the top, with several large trees or a single bolt on top
of a rock to choose from for a belay.
2. Left
Route [“左ルート”, 60m, V] **
Pitch 1: Same as for No.2 Slab Route.
Pitch 2: Climb up and left about 15m to a belay at the start of a
groove.
Pitch 3: Climb the groove to gain a steep crack. Climb the crack and
belay at the tree on top. A full 50m rappel will get you back to the ground,
but you can split it up at any of the belay stances if needed.
3. Right Route [“右ルート”, 70m, IV+] *
Pitch 1: Climb up a right sloping
chimney to reach a belay stance at a tree.
Pitch 2: Climb the face for about
20m to a belay. There are several possible ways for this pitch.
Pitch 3: Ascend a few metres up and
left to gain a polished ramp. Climb this ramp on small holds to the top.
4. Right Route – left finish [V-]
An alternative finish for Right
Route, climbing up and left from the second belay stance to gain a steep crack.
When you reach the top of the crack, turn right to finish.
The left finish leads up towards the tree with red leaves:
5. Right Route – double diedre [“右ルート - ダブルジェードル”, V-]
Pitch 1: Starting from the right
edge of the buttress, climb up the corner at grade IV to the tree belay.
Pitch 2: Climb up and through the
double diedre at grade V-, and continue to finish at the second belay stance
for Right Route.
Looking up the double diedre to the top:
6. No.1 Slab Route [“第1スラブルート”, 4 pitches, 100m, VI] ***
Pitch 1: Same as for No.2 Slab Route, but belay below the slab on the right at a stainless steel Petzl bolt.
Pitch 2: Climb the steep corner crack, with a mix of in-situ protection and cams, until the overhang. Traverse the slab out to the right on thin holds to gain the arête. Climb up past an intermediate anchor, over another steepening, to belay at the bolt anchor at the top of the slab.
Anchor at top of pitch 2:
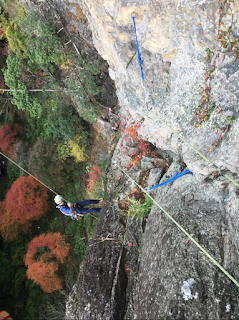
Looking down pitch 2:
Pitch 3: Climb a few metres up to the roof, then head up the steep slab on your left on crimps and poor feet. Once through the VI crux and onto the arête, climb up the path of least resistance to the anchor shared with No.2 Slab Route.
Pitch 4: Same finish as for No.2 Slab Route.
Japanese guidebooks:
If you can read Japanese, you can find more information about the Koesawa buttress in either of the following guidebooks.


No comments:
Post a Comment