Route Name: Free
Spirits (フリースピリッツ)
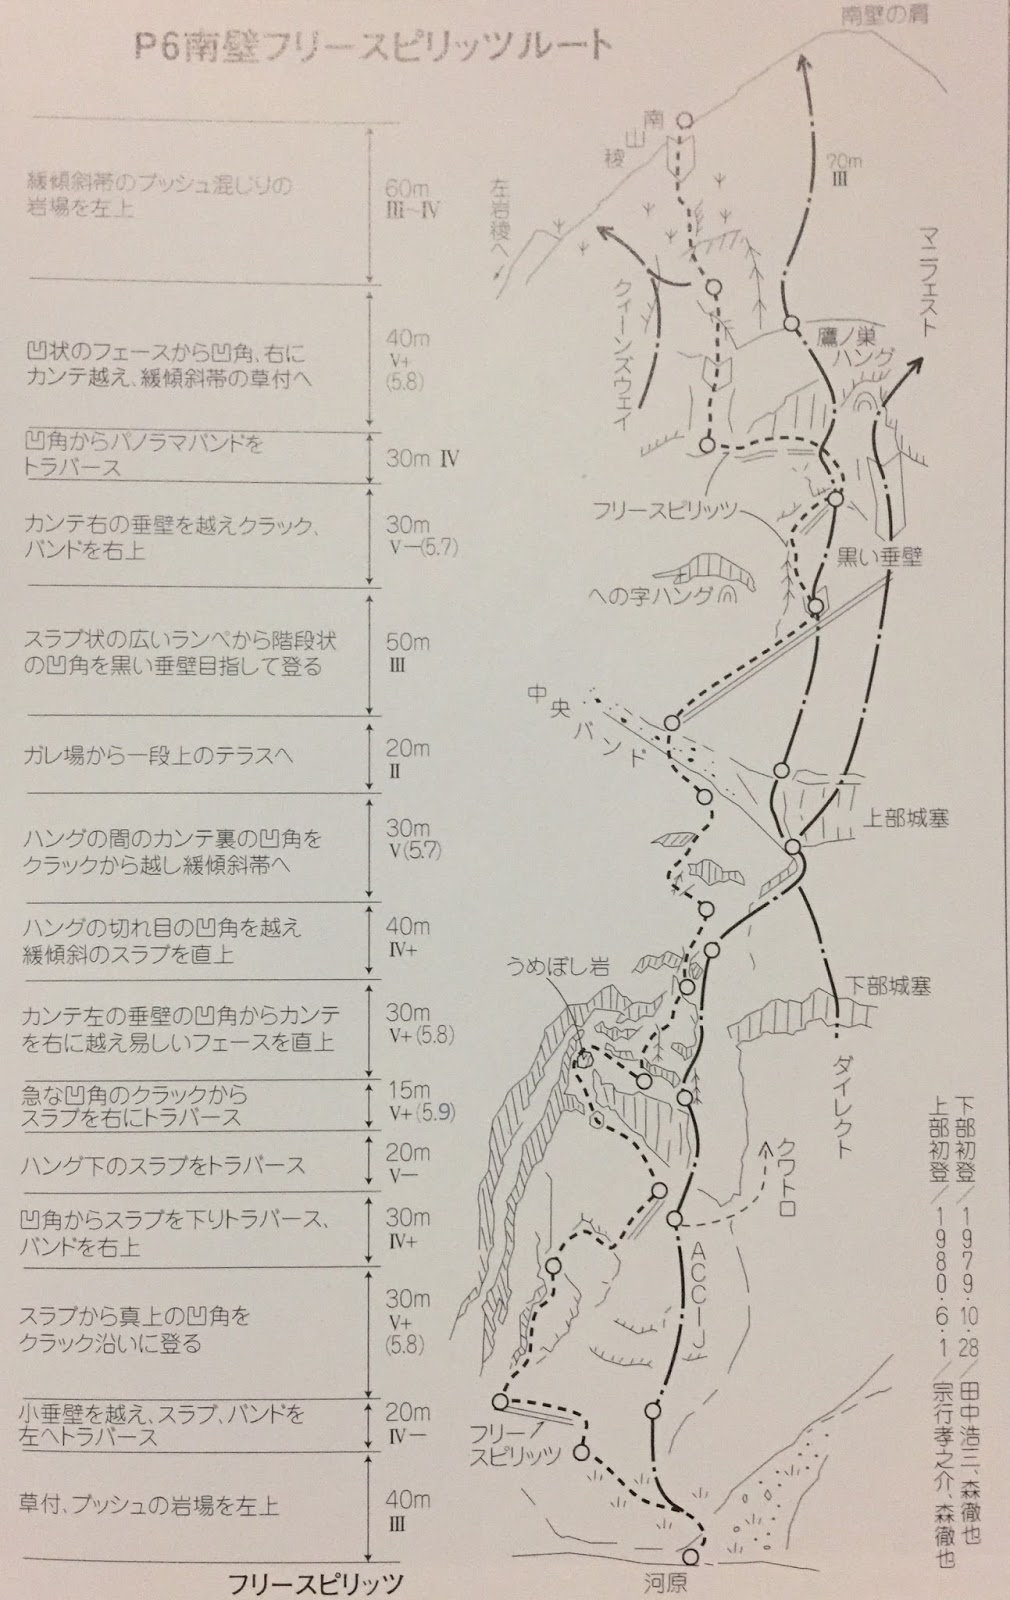
Mountain: Myoujo-san P6 South face (明星山P6南壁)
Length: 15 pitches (approx. 500m)
Time: 6-8 hours to the top of the last pitch
Grade: Crux pitch V+ (5.9) / Overall grade 5- alpine route
FA: Lower half = 森徹也、中田浩三 (1979.10.28) / Upper half = 森徹也、宗行孝之介 (1980.6.1)

Free
Spirits… A name to conjure with… Two simple words that perfectly embody the
ambience of this magnificent route, whilst also seeming to capture the essence
of the whole endeavour of climbing. Is there a finer rock climb in all of
Japan? If so, I am yet to find it!
Weaving
its way improbably up the steep and exposed limestone face of Mt Myoujo (明星山) in Niigata’s Jade canyon (ヒスイ峡), this route has everything you could wish for… 15 pitches and
500m of pure joy, with sustained difficulties and intricate route-finding.
Despite the modest altitude, the South face of Myoujo is most definitely alpine
in character and requires the full spectrum of skills and experience to
navigate safely. There is a lot of loose rock here and in-situ protection is
often absent, meaning you’ll need to divine the route in places, and place your
own trad protection whenever possible.
This
route is deservedly famous and universally praised among Japanese climbers, and
a powerful experience of one sort or another is guaranteed!
Getting
there:
Your
ultimate destination is the car park just past the Kotakigawa Hisui-kai tenbō-dai,
or Kotaki river Jade gorge viewpoint (小滝川ヒスイ峡展望台). This
viewing platform overlooks the South face of Mt Myoujo across the gorge, and the
nearby car park has a toilet block and space for a dozen or so cars.
If
travelling by car from Tokyo, expect a drive of around 5.5 hours each way if
traffic is good. The easiest route is up the Kanetsu Expressway, then left onto
the Joshinetsu Expressway just after the Kamisato Service Area (上里SA). Follow this all the way until it merges
with the Hokuriku Expressway near the coast, and head west as far as Itoigawa (糸魚川). At Itoigawa head left onto Route 148 and
follow this to Kotaki (小滝). Once there take a right turn
onto Route 483 through Kotaki village. Just after the Suzuki liquor shop (鈴木商店) turn right onto a smaller road and
follow it all the way to Jade Canyon and your destination. It should take
around half an hour or so from Itoigawa to the car park.
If
travelling by train, take the Shinkansen to Itoigawa, and then either a taxi
straight to your destination, or a local train to Kotaki followed by a taxi.
You could also walk there from Kotaki station in around an hour if so inclined.
Description:
Walk
across the car park to the edge and you will find a rough trail disappearing
down the hillside among the trees.

Scramble
down this trail for around 10 minutes to reach the riverside, then turn right
and walk along the river for about another 5 minutes until you come to a series
of large boulders. To reach the start of the climb you need to get across the
river. Usually there is an in-situ Tyrolean traverse to facilitate this, but if
you’re unlucky and there’s no rope in place you’ll need to find the safest spot
to wade across; at some times of the year it may be impossible due to high
water.

Once
safely across the river, walk up several metres to your right and you’ll reach
the start of the first pitch.
Approximate
pitch descriptions for the route are as follows:
Pitch
1: Climb up and to the left through vegetation and rock to reach a belay anchor.
(40m III)

Pitch
2: Ascend a few metres and then continue the leftwards traverse. The belay
anchor is up on the wall above. Do not be tempted too far left by another
anchor around a rock rib, that is for a different route. (20m IV-)
Pitch
3: Climb a tricky corner crack up and right. (30m V+)

Pitch
4: A short ascent is followed by an interesting and exposed downwards traverse to
climber’s right, then a final climb up and right to the belay. (30m IV+)

Pitch
5: This is arguably the crux pitch of the route, and ironically the next belay anchor
is almost directly above, but you’ve got to bypass the roof by the line of
least resistance to get to it. Follow a thin traverse up the break at V- until you
reach a slightly overhanging chimney. Climb the chimney, then make a downwards
traverse out to the right to gain a belay beneath more overhangs. (35m V+)


Pitch
6: Climb a steep chimney for several metres, then make delicate moves around
the rib to your right, and continue up steeply to belay beneath more overhangs.
(30m V+)

Pitch
7: Climb the overlap and then continue upwards to a belay beneath yet more
overhangs. (40m IV+)

Pitch
8: Ascend to your left around a triangular rock feature, and then climb a steep
crack and groove system on trad protection, finishing up very loose rock to
belay on the edge of the Chuō band terrace. (30m V)
Pitch
9: Cross the Chuō band and climb easy but loose terrain, taking care not to knock any
stones down, and anchor wherever you can at the start of a rightwards ascending
ramp. (20m II)
Pitch
10: Climb the ramp on your right for a full rope length and belay beneath
overhangs. (50m III)
Pitch
11: Climb an intimidating and run-out vertical crack on your left, then ascend
rightwards on better holds to a belay anchor. (30m V-)
Pitch
12: Climb upwards a little way until the rock blanks out beneath the enormous
roof of the upper face. Now make an outrageously exposed traverse around the
rib on your left. As you round the rib you will see that the traverse
continues for some way on a tiny handrail of holds, quite simply spectacular!
Eventually you will reach a belay on a ledge. (30m IV)

Pitch
13: Climb the smooth steep slabs above with just enough holds to facilitate
progress. With a series of bolts a metre apart, the smooth section can be
aided if necessary. Then climb up and rightwards on better holds to belay on a
large ledge. (40m V+)
Pitch
14-15: Continue up and to climber’s left, following the line of least
resistance, until you reach the ridgeline at the top of the face. (60m III-IV)
Descent:
There
are two options for descent back to the car park.
(i) If
you can locate the top anchors of “Jade”, to the right of “Free Spirits”, you
can abseil that line on bolted anchors back to the river.
(ii) If you’ve had
enough of the void by this stage, there is a ‘walk-off’, but it’s rather steep
and overgrown, and not at all easy to find. Essentially you need to start scrambling
down towards climber’s left from the point where you met the ridgeline, and
follow the most well-travelled path down the ridge. At some point, you’ll start moving
rightwards. There are plenty of trees, and these can be abseiled from if you
feel the need. Eventually you should come across a fixed rope and then a more
well-trodden path lower down marked by pink tape on tree branches.

From
here simply follow the tape markers, and you will safely reach a water pipe
that crosses the gorge. Turn right here and follow an overgrown but flat path
alongside the river for several hundred metres and you will reach a bridge.
Cross the bridge, then walk back along the road all the way to the car park.
From the top of Free Spirits to the car park should take up to about 1.5 hours.
Overall:
It is
hard to avoid superlatives when discussing this route. Long, exposed and
consistently steep, it weaves an ingenious and at times improbable line up one
of the largest faces in Japan. It is the stuff dreams are made of! Bring double
ropes, a full set of quickdraws (predominantly extendable ones), a trad rack of
nuts and cams, and a sense of wonder.
Please support Climb Japan by picking up a copy of the book at Amazon, available in print or e-book format:

Please support Climb Japan by picking up a copy of the book at Amazon, available in print or e-book format:
Your blog theme is professional and your images are interesting. I live in Middle East and can't see Japan, nut your images are good for me.
ReplyDeleteThank you for the nice words. I'm glad you're enjoying this site, and I hope you get the chance to visit Japan one day. All the best! Tony
Delete