Route Name: Hida ridge (飛騨尾根)
Mountain: Gendarme (ジャンダルム 3163m)
Map sheet: 37 [Yama-to-kougen-chizu (山と高原地図) series]
Time: 2-3 days round-trip
Difficulty: Grade 3 alpine route (IV crux pitch)

The
Gendarme (Jandarumu, ジャンダルム)
is the name given to a distinctive and prominent rocky summit on the dramatic
ridgeline between Mt Okuhotaka (奥穂高岳) and Mt Nishihotaka (西穂高岳)
in the North Alps of Japan. At 3163m it sits just shy of the 3190m altitude of
Okuho, but the ridge that connects them is both serious and thrilling at any
time of year, making the Gendarme’s summit a highly desired prize among
Japanese hikers and climbers.
High
up on the Gendarme’s western aspect is a steep ridgeline of such aesthetic
grandeur and isolation that it simply demands to be climbed by anyone who
spends enough years operating as an alpine climber in Japan. It is named the
Hida ridge (飛騨尾根) and is instantly recognisable to anyone who has gazed
south from the top of Okuho. From the precarious summit of the Gendarme the
upper Hida ridge plunges down in a series of vertical steps between terraces
forming, in the words of one well-known commentator, a truly “compelling
line to the sky”.
In
summer/autumn it can only be accessed from above, and so aspirants must
traverse to the Gendarme and then scramble down the gully just south of its
summit until a traverse gains access to the T3 terrace. From here the final few
hundred metres of the ridge can be climbed back to the Gendarme.
A
full integral ascent of the ridge from bottom to top requires snow to smooth
out the access from below, and the optimal time is from early April to early
May. With an altitude gain of over 1800m this is an enormous route. It covers
the full spring alpine spectrum from long, steep and exposed snow slopes
through to hours of rock-climbing in crampons at altitude and, with a serious
and involved traverse from the Gendarme to Okuho, the summit of the Gendarme is
by no means the end point.

Getting
there:
This
itinerary is a round trip from Shin-Hotaka Onsen (新穂高温泉).
If travelling by train from Tokyo (東京)
or Shinjuku (新宿),
take a Super Azusa limited express train on the Chuō Line (中央線) out to Matsumoto (松本) station. From there you can take a bus to Shin-Hotaka
Onsen.
If
travelling by car from Tokyo, get onto the Chuō Expressway and then the Nagano
Expressway to Matsumoto. Exit the Expressway and get onto Route 158. Stay on
this road all the way to Hirayu, and then turn off onto Route 471. Eventually
you will come to a bridge across a river and turn right onto Route 475. This
will take you all the way to Shin-Hotaka Onsen.
Park
in the large free car park by
the river, accessed on the left from about halfway through a long avalanche
tunnel.
Description:
DAY
ONE
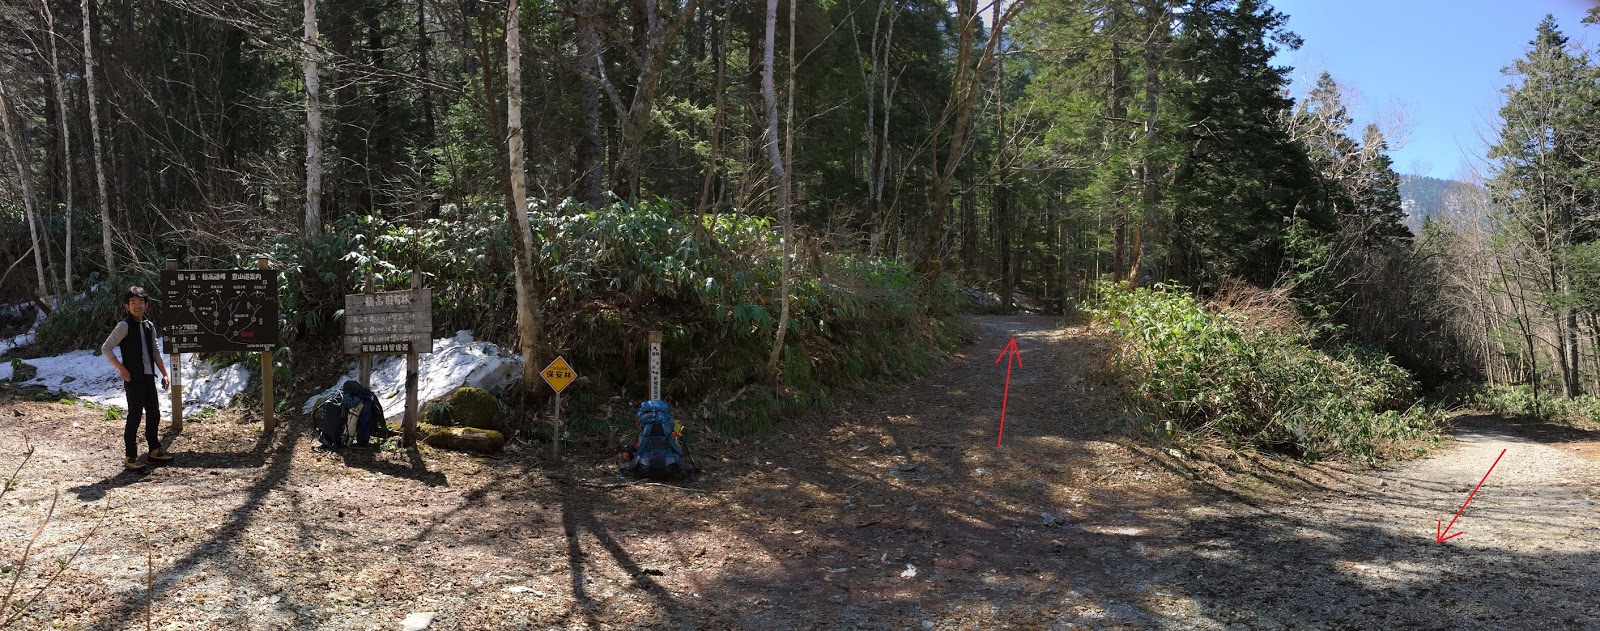
Exit
the free car park by the tarmacked path at its northern end and walk for about
5 minutes until you join the road and reach the Information Centre. Don’t
forget to leave your planned itinerary here, with emergency contact details and
your projected return date/time.
Continue
walking up the hill and you’ll soon pass the Hotel Hotaka and then the
Shin-Hotaka Ropeway (新穂高ロープウエイ). Pass through the barrier
at the end of the road and walk up the rindou.

The road is initially tarmacked but soon turns into dirt and gravel as it gains
height alongside the river past a series of dams.

After about an hour a series
of switchbacks will bring you to the Hotaka Hira-goya hut (穂高平小屋),
situated in a lovely open alpine meadow. Continue on past the hut as the road
becomes rougher and gradually gains height. After another hour you will reach
the signed turn-off for the hiking trail on your right up to Mt Okuhotaka, at
the entrance to Shiraide-sawa (白出沢).
Take
this path up through the forest. It is not very distinct when under snow, so
keep your eyes open for the trail.
Just as it appears to be taking you up into
neighbouring Nishiho-sawa (西穂沢), the trail disappears into the
forest on the left and traverses across the bottom of the Tengu ridge. Once
past the ridge you’ll enter Shiraide-sawa and continue ascending the steepening
snow field until you reach the fork with Tengu-sawa up on your right.


This
junction, just short of the Shiraide Ōtaki waterfall (白出大滝, not yet visible from here), is a good spot
to set up basecamp as you’ll be coming back down past here the next day. Choose
your location wisely so as to avoid any potential avalanches that might come
down Tengu-sawa or Shiraide-sawa above.

Looking up the steep Tengu-sawa:


DAY
TWO
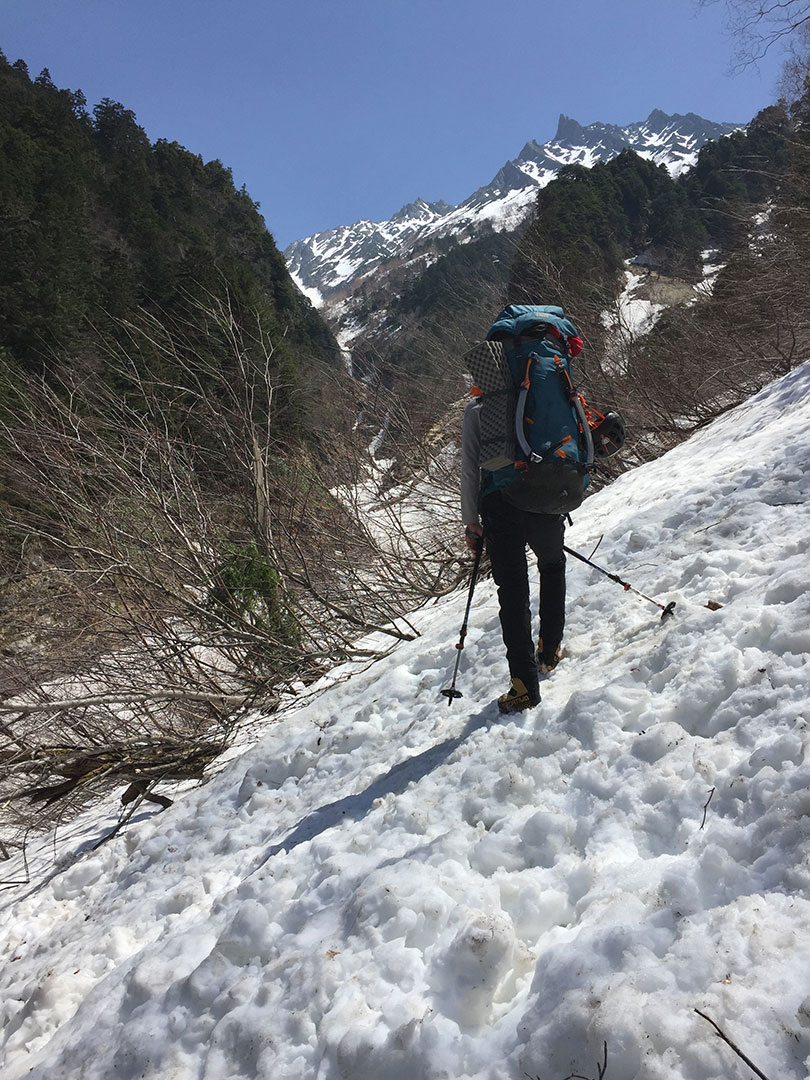
This
is a very long day, so aim to be on the move by 3AM at the latest. From your
tent head upwards into Tengu-sawa and climb it for 2-300m. Just before the
point where the sawa forks, climb up the steep snowfield in the re-entrant on
climber’s left to gain D ridge. Once on the ridge crest continue front-pointing
up the snowy ridgeline for several more hundred metres.

You will see the lower
Hida ridge (C ridge) above you running from left to right. To access the bottom
of it you need to make an exposed traverse across the intermediary sawa and
then climb up steep mixed terrain onto C ridge.

At
this point the lower Hida ridge is in the dwarf pine (Haimatsu) zone, so for the first hour up the ridge you will be
bush-whacking through this.


Eventually
though you will get above the haimatsu and onto the rocky ridge itself, and
this is most likely the point where you will want to get the rope out and start
pitching.

There
are no fixed anchors on the Hida ridge, and in-situ pitons are sparse, so you
will need to make your own judgements around where to end each pitch. In total
I counted 13 pitches between the start of the steeper rock-climbing and the
summit of the Gendarme, which suggests around 500m of pitched rock-climbing in
crampons. The rock is generally between grade II (5.5) and grade IV (5.7) and
offers excellent trad placements as well as plenty of spikes for slings.


The
higher you climb, the steeper the ridge becomes and the more involved and
exposed the climbing as you surmount each section of ridgeline between the
rising terraces. Eventually you will reach the easier summit rocks, from where
a short scramble will bring you to the top of the Gendarme and its famous steel
Angel. The views in all directions are jaw-dropping.


On the 3163m summit of the Gendarme:

From
the summit of the Gendarme to the summit of Okuho looks a mere stone’s throw,
but it will likely take several hours and is very involved and serious in
places. To get off the Gendarme you need to locate the rappel anchor just below
the top on the north-eastern aspect. A rappel on double ropes will gain the
snow slope below. You now need to traverse the knife-edge snow ridge and climb
up to the top of the Donkey’s Ears formation (Roba-no-mimi, ロバの耳). Consider belaying this section as
the exposure is astronomical and you will most likely be doing it on soft
afternoon snow.


You
will find another rappel anchor on the other side of the Donkey’s Ears below
the top. A full 50m rappel will get you down and across to the top of a short
chain section. Take care pulling your ropes down.

From
here traverse over to the start of the long rock scramble back up towards the
Horse’s Back (Uma-no-se, 馬の背).

From the top of the ascent a short
knife-edge snow traverse brings you to the bottom of the Horse’s Back. Climb
this razor-sharp rock ridge, then traverse a narrow connecting snow ridge, and
then easy snow slopes will bring you to the 3190m summit of Okuho.


Continue
off the other side of the summit down the normal hiking trail for about 30
minutes. Eventually you will reach the final snow slope that will take you down
to the ladders to the Okuho-Sansou hut. There is a rappel anchor if you’d
rather rappel down this exposed snow slope.
If
the hut is open (Golden Week onwards) you might wish to consider staying the
night and descending Shiraide-sawa to your tent the following morning when the
snow is firm and frozen. If not, you now need to drop off the col to climber’s
left behind the hut and descend the steep 1200m of Shiraide-sawa back to your
tent at the entrance to Tengu-sawa. At one point the trail heads off out of the
sawa on the right and descends down the ridge to bypass the Shiraide Ōtaki
waterfall. Once you exit this section, a short descent will bring you back to
your tent.
DAY
THREE
All
that remains is to reverse day one back to the road and along down to
Shin-Hotaka Onsen and the car park.
Overall:
An
immense itinerary, both in stature and in satisfaction. Take 50m double ropes
and a basic trad rack, as well as double axes. Be prepared for the seriousness
of this outing, and the deep connection it will foster between you and one of
the most striking bits of topography in the country. This climb is one of Japan’s
true alpine gems!
For all the info you need to climb ten of the Japan's most classic alpine routes, get your copy of the book on Amazon!

No comments:
Post a Comment