Route name: West ridge (西尾根)
Mountain: Kasumizawa (霞沢岳 2645m)
Map sheet: 37 [Yama-to-kougen-chizu (山と高原地図) series]
Time: 1-2 days round-trip
Difficulty: Grade 1 alpine route
As
you exit the Kama Tunnel on route 24 on your way to the renowned mountain hot
spring resort of Kamikōchi, you find yourself in a beautiful valley with two
large mountains towering above you, one on either side of the road. On your
left is the great fire mountain, Mt Yakedake (焼岳 2455m),
with its active sulphur vents and jagged crater. On your right is the slightly
higher Mt Kasumizawa (2646m), gateway to the Hotakas. There is only one marked hiking
trail to the summit of Mt Kasumizawa on the maps, from the Tokugo Pass (徳本峠) to the east. Walter Weston attained his
first view of the Hotaka range from this pass in 1891, and was rightly impressed.
The views into Dakesawa (岳沢) are
second to none, and until the Kama Tunnel was built much later than Weston’s
day, this was the only way to access the area.
But
here we are interested in the opposite aspect of the mountain, which rises
steeply from route 24 and is only really accessible in the snow season.
Kasumizawa’s West ridge gains 1100m from the roadside in just 2.5km. With
moderate rock and snow difficulties in its final few hundred metres and that
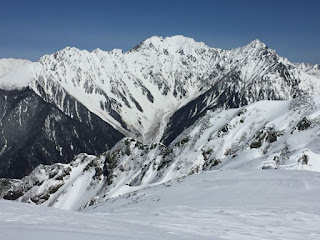
mind-blowing view across to the Hotakas, I would strongly recommend this outing
for anyone looking to step up to some of the larger alpine objectives in winter
conditions.
Getting there:
If
travelling by train from Tokyo (東京)
or Shinjuku (新宿),
take a Super Azusa limited express train on the Chuō Line (中央線) out to Matsumoto (松本) station.
From there you need to change to the Alpico Line for a 30-minute train
ride to Shinshimashima (新島々). The final leg of the journey is a bus ride from outside the
train station at Shinshimashima to the entrance of the Kama Tunnel (釜トンネル), which leads towards the alpine
village of Kamikōchi (上高地),
nestled at the foot of the Hotaka range in the North Alps. The tunnel is barricaded
during the winter months, so the entrance bus stop is as far as you’d be able
to go by bus.
If travelling
by car from Tokyo, get onto the Chuō Expressway and then the Nagano Expressway
to Matsumoto. Exit the Expressway and get onto Route 158. Stay on this road all
the way to the Kama Tunnel entrance. You can park your car at the Sakamaki
onsen, about 1.5km before the Kama Tunnel (¥500 for all-day parking), or in any
of the numerous lay-bys along the road. The advantage of using one of the
larger lay-bys is that you can pitch your tent for the night as well.
Description:
Get
your head torches ready as you pass the barricades and enter the Kama Tunnel.
It is 1315m long and rises through the pitch black at a steady gradient. As you
exit the tunnel you’ll see a new tunnel under construction straight ahead, but
for now just follow the road on the left. About 3km from the start of the Kama
Tunnel you’ll come to a signpost on your right, at the bottom of the West
ridge.
Turn
right at this sign and walk up the rough rindou
for a couple of minutes and you’ll soon see a thin path heading up the steep
sasa-covered slope to an electricity pylon on the crest of the ridge.
On
reaching the pylon turn right and begin your ascent of the West ridge. The
first few hundred metres rise in a series of short steep ascents, and you’ll
most likely find ice on the ground, making it slightly treacherous and
tiresome. There’s plenty of sasa grass to grab hold of though, and it’s not
difficult.
After
a couple of hours things begin to steepen somewhat and the forest starts to
thin out a bit. You’ll start to notice a significant snow cornice on the edge
of the ridge on climber’s right.
Mt Norikura in the distance:
Eventually
you’ll exit treeline and find yourselves on a sharp snow ridge. The exposure
starts to build up now, and you’ll soon arrive at the crux of the route, a rock
tower that bars access to the final summit slopes.
The
rock tower is well-featured, and in 2016 there was even a (rather unnecessary)
fixed rope hanging down it. There are in-situ rappel anchors at the top as
well, in case you feel uncomfortable down-climbing it on your return journey.
A
short sharp traverse from the top of the rock tower along an exposed snow ridge
brings you to the final slopes, and you’ll see the snow-covered summit up above
you. This upper part of the mountain is completely open, and the views and air
around the 2646m summit are amazing, including the corniced ridgeline leading
across to the subsidiary peaks of K2 and K1.
Summit:
Mt Yakedake across the valley:
Now
you just need to reverse the whole thing!
Overall:
Moderate technical difficulties coupled with a long and
steep ascent and descent make this route a superb introduction to the North
Alps winter variation routes. The fact that the summit is only accessible in
winter from this side of the mountain adds substantially to the route’s appeal.
A 30m rope will suffice and, if you’re comfortable with exposure, will most
likely stay in the pack.


No comments:
Post a Comment